5 Amazing On-Page SEO Tactics For Boosting Your Rankings
Last Updated on January 3, 2021 by Santhosh Muralidhar
On-Page SEO is like the heart of Search Engine Optimization.
The chances of ranking your web page or blog posts on top of Google will become higher if you optimize the content with the best on-page SEO tactics.
As you know probably know some of the basics of this on-page SEO are like optimizing meta descriptions, title tags, adding internal links, updating keyword enriched alt tags, creating appealing headlines, improving page speed, etc.
In fact in my how to start a blog guide, I had given a detailed explanation about doing on-page SEO for a beginner’s brand new website.
If you haven’t checked please do go through that content once before reading this further.
Because here in this blog post I thought of sharing the 5 most advanced on-page SEO tactics.
These tactics have Increased my own blog search traffic. And it has given good results for my client projects as well.
Suppose you still don’t want to believe in my words, you could just swiftly refer to the screenshot of my Google search console results and stats.
In 2019 I got my first 800+ clicks to my blog from search engine optimization technique.
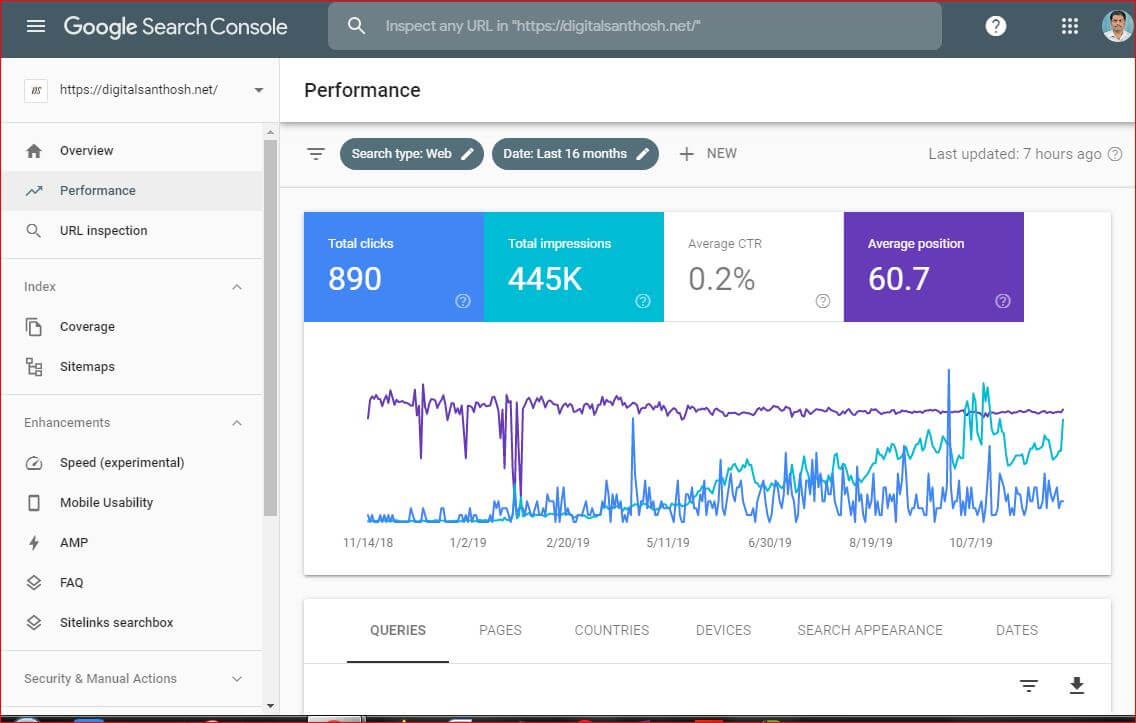
Organic search traffic contributed to around 20% of my website’s traffic.
I don’t rely solely on SEO to get traffic, because I believe in diversity.
My blog gets more traffic from referral and social channels as well.
And my blog is inching towards 1000+ visitors monthly traffic. From the past few months, my blog recorded 4000+ sessions.

Yup, for now, I do know something interesting about On-Page SEO. And I do know what works and what won’t work in SEO.
That’s the reason why I thought of sharing my unique On-Page SEO tactics in this blog post.
To be frank these tactics are not theory assumptions.
These are actually working great for me and I have got data and stats to back it up as well.
Of course, my blog is small and traffic could be small as well. Sure my website might not be as big as some top popular blogs like for example Backlinko, ProBlogger, etc.
But I have built a blog that gets quality traffic consistently. And to build a blog from scratch and get over 1000+ pure search visitors in 2019 is nothing short of good.
1.FAQ Schema
Frequently Asked Questions Schema also known as FAQ Schema is like one of the latest hot trends in On-Page SEO.
People are always looking for solutions and answers to their questions.
Many people search with questions on Google. So, with the help of an FAQ Section users can now quickly find answers to their queries from various websites in the Google search without needing to click on an organic listing.
The thing with FAQ Schema is that people don’t have to visit a website to read the answer to their queries. And they would get the solutions while browsing on Google itself.
So, basically, you could now help the users to give them fast and precise answers to their common questions.
The FAQ will immediately fetch relevant answers to users on the basis of their query.
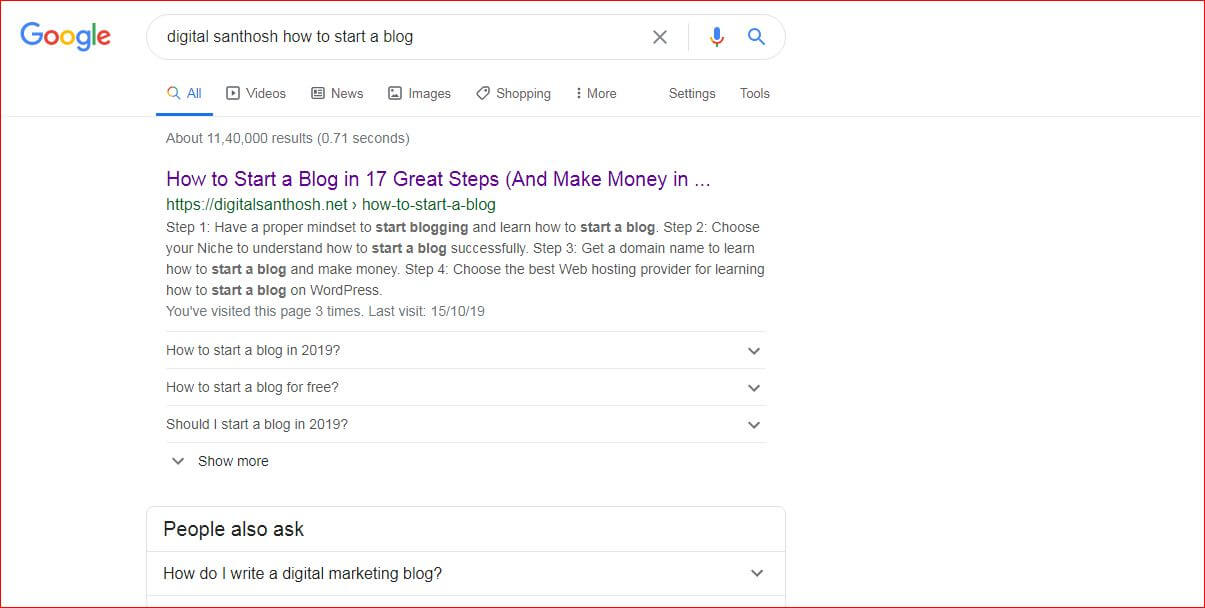
The below screenshot illustrates the practical demonstration of FAQ Schema on the Google search engine.
Google has adjusted its algorithm to reward higher rankings for those websites which have implemented FAQ schema.
As a matter of proof, you could see the results for one of my own blog pages which got a ranking spike after successfully implementing FAQ.

Many top SEO experts including Neil Patel have acknowledged the significance of adding FAQ section for blog posts in order to boost rankings.
This is also a prominent On-Page SEO factor.
Implementing FAQ schema for a WordPress blog is easy. You don’t have to do any technical work.
Yoast plugin will provide the functionalities to add FAQ Schema for your blog posts. So, you need to install the Yoast plugin for your blog site first.
Refer to the below screenshots for implementing FAQ Schema by using the Yoast plugin.
The first step is to choose the FAQ block from your post editor options. Usually, FAQ blocks appear at the bottom part of the posts.

Next, you will need to enter a suitable question and answer in the given fields.

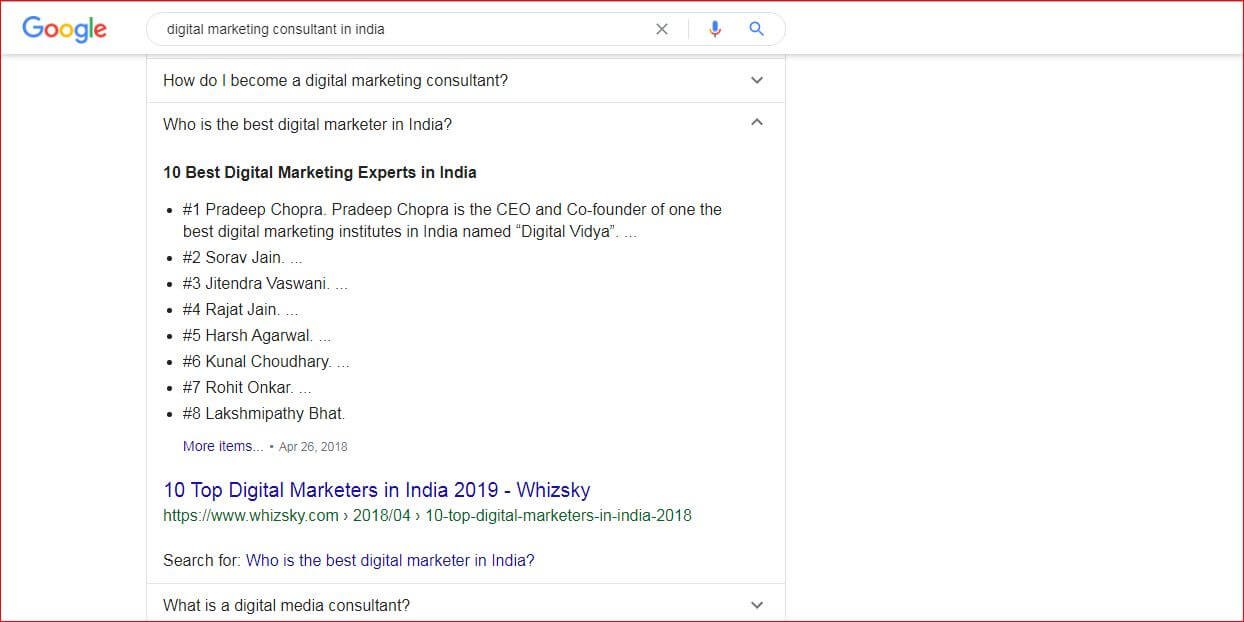
You could easily pick up questions by doing some research for your topic’s keywords on google. For example, I searched for the keyword “digital marketing consultant in India”. I was then able to pick up a bunch of relevant questions from other sites FAQ snippets. I have shown this demonstration in the below screenshot.
From my own observations, I found out that FAQ works greatly when the questions contain the keyword of the page and the answers are written in the natural language and presented in a relevant manner.
Some reports also suggest that websites that are already ranking in Top 10 results of the SERP, will get a much bigger ranking boost with the implementation of FAQ Schema on their website.
2.Table of content (Page Jump links):
The table of content is a set of internal jump links to the various subsections of a particular blog post. Basically, this table of content will comprise a set of page jump links.
The intention here is to carry a user to various sections of the blog posts by using the page jumps.
When such links are clicked by a web visitor it will jump to take the user to the appropriate section of the blog post.
In this way, web visitors can fastly and also easily navigate to a specific section of the blog posts. They wouldn’t have to drag the cursor across the entire page for searching specific info/content.
Generally, while users read a long article they might find it a bit tough to scroll through everything.
People who read the blog posts might want to go up and scroll down here and there to properly grasp and analyze your content.
So, here the table of the content feature will allow the user to easily scan through the entire content by just one or two clicks.
The other cool fact surrounding page jumps is that it helps to show your blog posts with Rich snippets on Google search.
A report from Backlinko suggests that Table of content is one of the key on-page SEO ranking signals in the Google Algorithm.
This is how the table of content appears in a blog post. They usually appear like a cluster set of internal links for the H2 & H3 Subheading (main heading) sections in a blog post.
You can set the page jumps to appear on top of your blog posts before the beginning of the first H2 Subheading.
Installing the Easy Table of Content plugin for free is the best way to implement page jumps.
Follow these steps to set up the Table of content in your blog post.
After you install the plugin go to the Easy table of content dashboard. You could this step by simply hovering around your settings section and select the table of content option in the WordPress dashboard.
So, next, you will be asked to choose the desired options. This will help you customize the table of content plugin settings for your WordPress blog posts.
You could basically choose where the table section should appear in the post, the color for the page jump links, background theme for the table of content section, fonts, etc.
To begin within the general section of the plugin you will have to first choose the enable support and auto insertion options for your posts and pages.
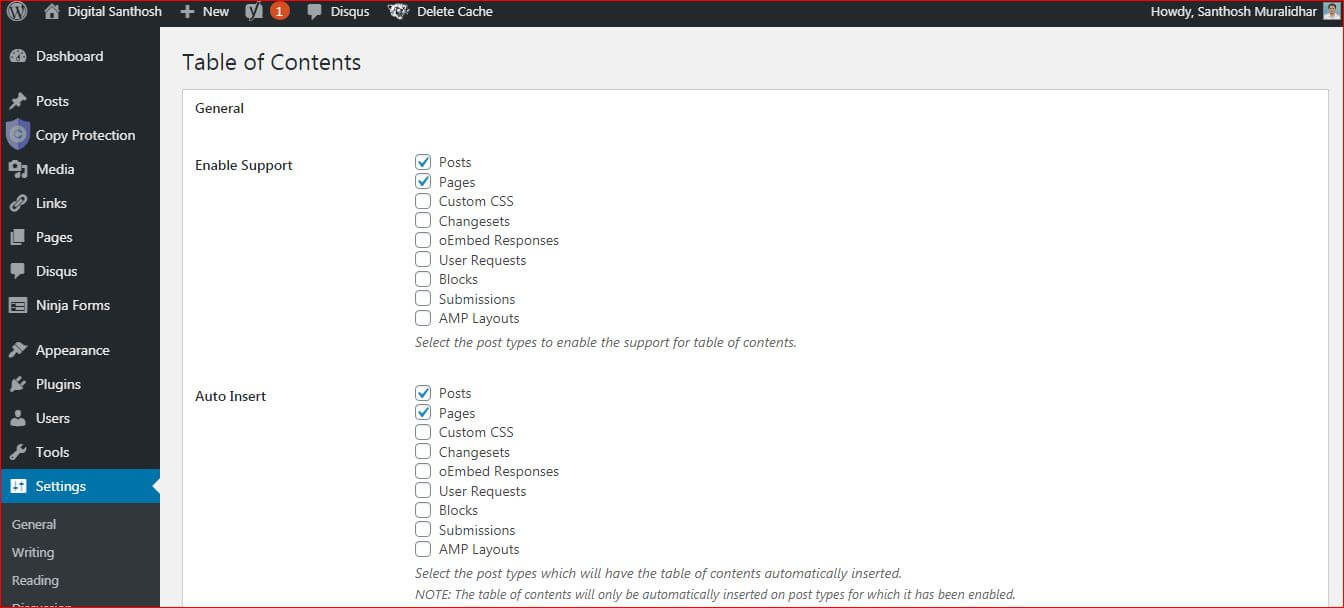
The remaining options under the general section could be kept as the default setting only.
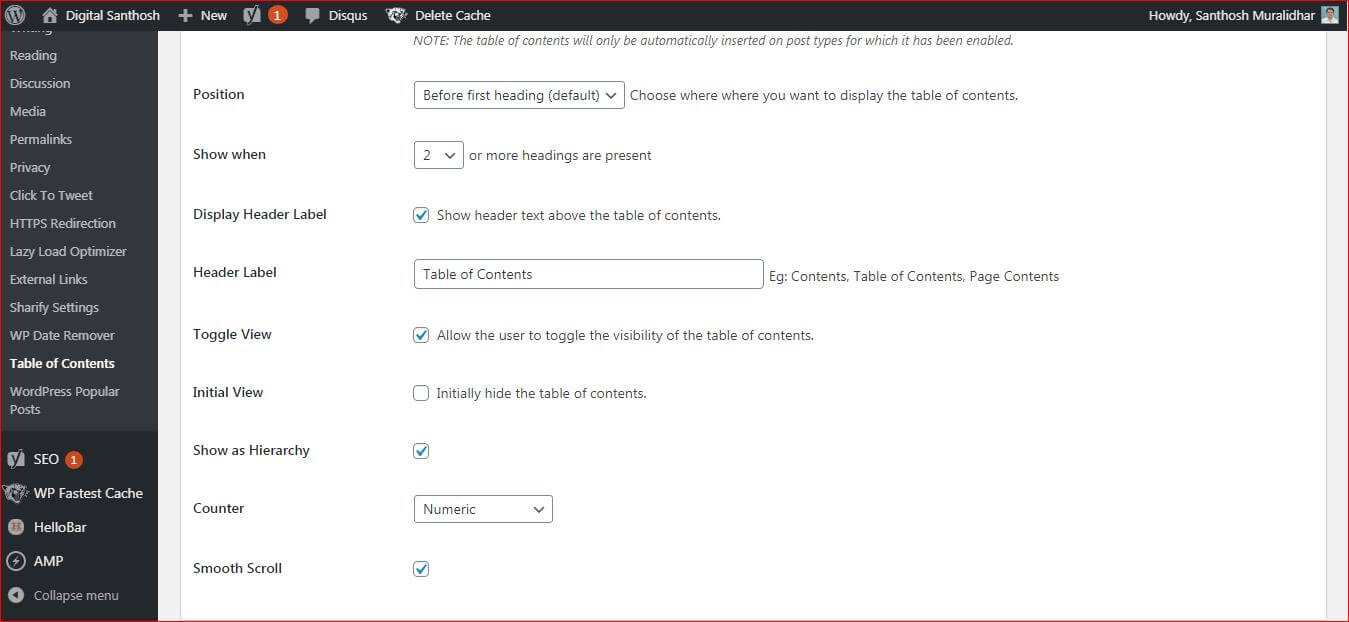
Also similarly, I would recommend you keep the default settings for the options under the appearance section.
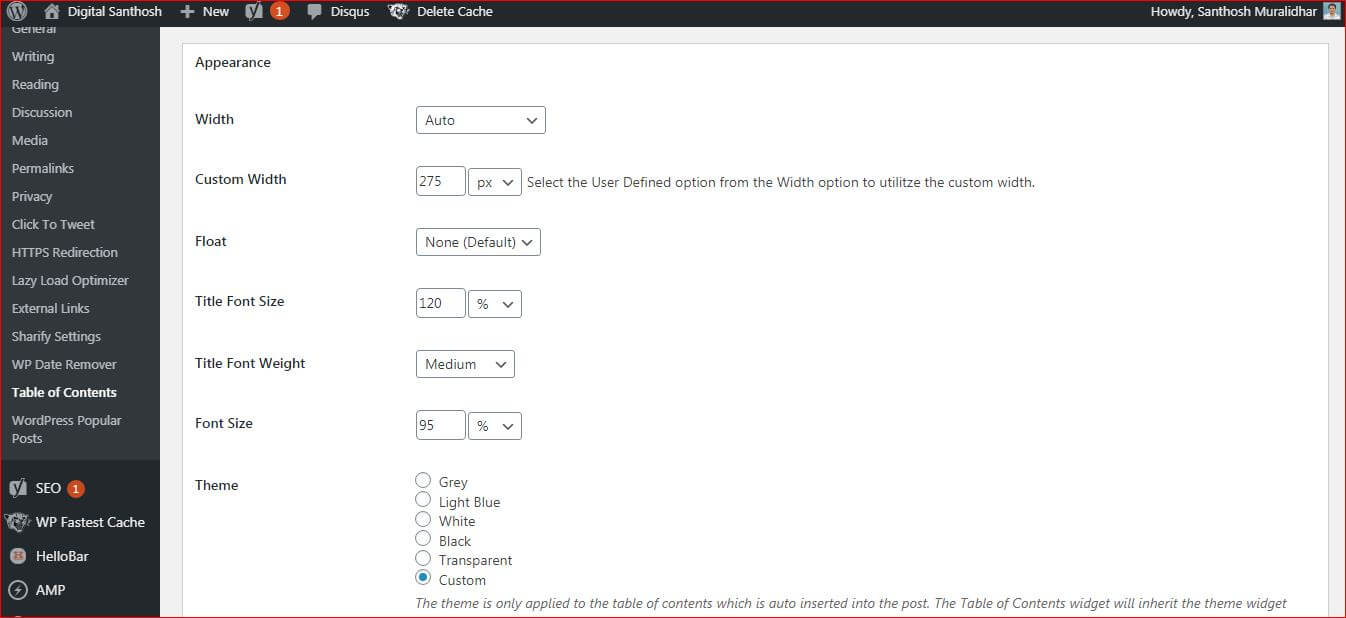
Because for me the default settings have worked well for my posts.
Next coming to the custom theme part you can here easily select the font and color for page jump link color, table background color, link anchor title color, etc.

In the advanced setting section, you must choose which headings must be included for the table of content.
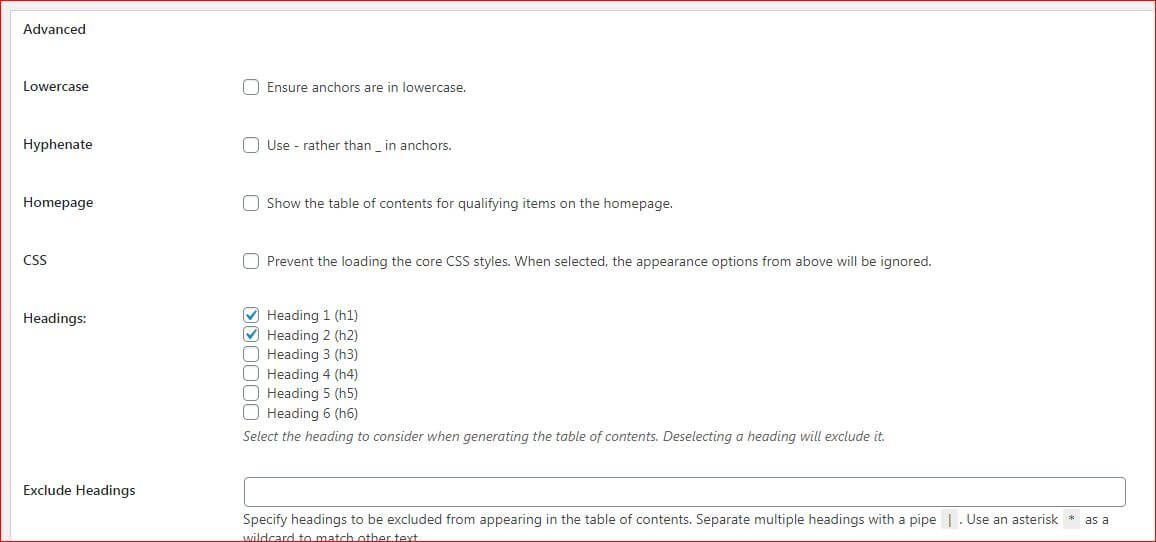
I would advise you to include H1 & H2 headings. Because those are the main top-level headings of a post or page. They carry more weight than other subheadings.
Also, there is an option to exclude specific headings from your post as well. So, you could use this feature. if you want some particular headings to be not displayed in the table of the content section.
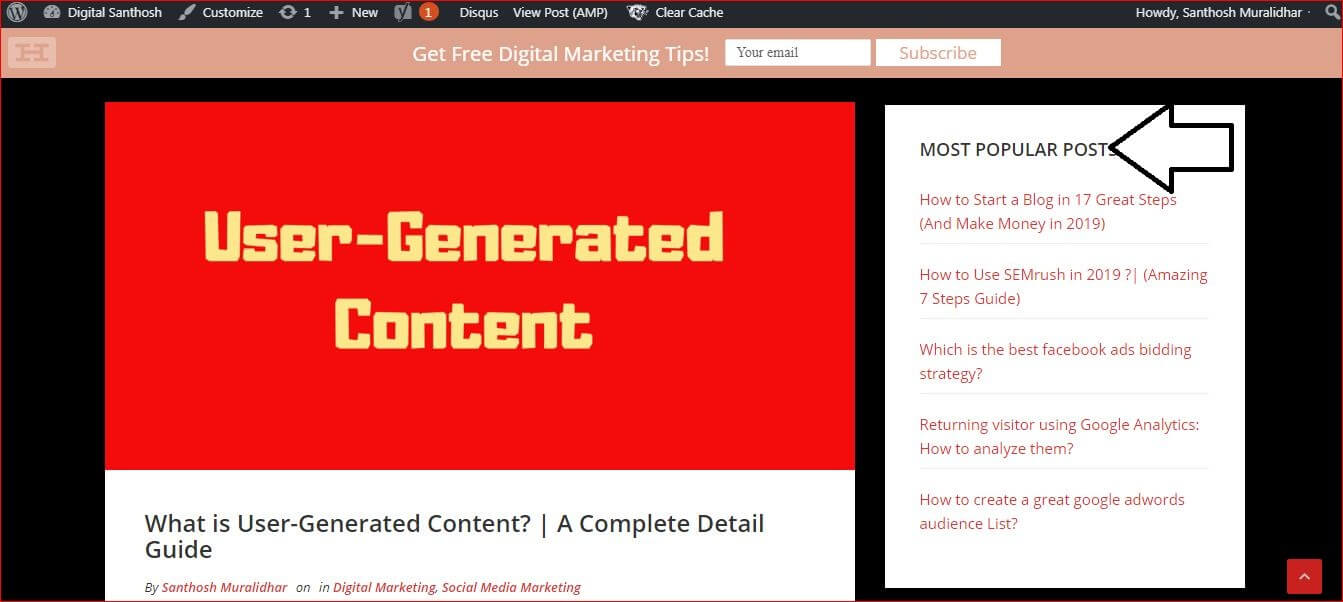
3. Display Popular posts and add internal links to them
When you link all your pages to the most popular posts of your website, It will send a signal to google implying that those are your top-performing pages.
As you know Google always wants to rank those pages which are popular and have high page rank.
You could use several tricks and hacks to increase the number of internal links on your blog and pass more ranking juice for your popular blog posts.
Display Popular Posts
One such trick is to display the most popular posts on the sidebar of your blog page.
You should use the WP Popular post plugin to internal link your popular posts and display them on the sidebar.
After you activate the plugin, it will automatically pick up the popular posts on the basis of the visitor count.
So, the posts with the highest visitor counts will be displayed on every page of your blog. Thus, it will create a huge number of relevant internal links as well on your site.
What this does is that it creates a separate section for your most popular posts on every page or post of your blog.
And that section will be displayed in the sidebar of each and every post of your blog.
In that way, every blog post will internally link to the most popular post section of your website.
This will help your blog readers to regularly visit and read the most popular posts as well.
Google will also give more preference and prominence to rank such posts higher on the search results.
Perhaps you won’t need any technical knowledge to setup & display the most popular pages on the sidebar of your blog.
Because as you know almost all the functionalities can be integrated via the WP Popular post plugin itself.
Add Menu Links
The other trick is to add menu links for your popular pages and posts.
For this, you will have to first create suitable menus and categories via your WordPress theme settings.
I have actually demonstrated those steps and procedures to create menus in my how to start a blog guide.
You need to ensure that your menus appear to be easy to navigate. The text of the menu should also be relevant for your blog posts.
These menu links and category links usually appear in the header section of your blog site.
Recently google has given the guidelines suggesting that links within the body tag section of a page will have more juice rather than placing a link in footer or header.
But that will not stop people from clicking the navigation links on the header section of a site which appears relevant to them.
So, in a way these menu links are actually helping people to find more useful content. And what helps people will also have more weight in the eyes of Google algorithm.
The main logic here is to add internal menu links for helping your people to navigate and not to spam it with a ton of links. This will eventually have a positive impact on your Google rankings.
For example on my website, when a visitor lands on my homepage, he can easily navigate to my popular blogging guidepost by just clicking on those menu links.
Adding Internal Links
My third tip is to add your internal links to your popular pages in the top section of your blog posts. In fact, an article from backlink also suggests the same.
The internal links which appear in the first paragraph of your blog post will have more ranking juice than those internal links which appear at the bottom part of your post.
This is mainly because most visitors won’t go and scan your bottom portion of your blog post. So, adding a link over there is not so helpful.
This actually immensely improves the visibility of the internal links as well. Because most people scroll over the top portion of the posts. And so chances of the visitors interacting with the internal links to my blogging guide will be higher.
4. Add keywords to your images
Keywords of the image names are a relevance signal for the Google algorithm. This actually backed up by the reports from Backlinko as well.
From my own experience, I could say that my digital marketing consulting page sawed a good spike in rankings after I updated all my images with suitable keywords.

Again you should keep in mind that it is not about forcing keywords into the file names. Instead, keywords should be added naturally to the file names and should appear in a relevant manner.
Along with that, you should focus on including your keywords in the image alt tags and description tags.
Nowadays many users prefer to consume content in visual format.
Hence optimizing your images would enhance the rankings and traffic of your blog.
5. Using CDN to improve the page speed
CDN stands for a content delivery network. It actually helps in decreasing the page speed tremendously.
It is like a system that delivers the content to the blog visitor by fetching the information of the content from the nearest data center location of a particular user/visitor.
So, to understand this properly let us consider two different cases.
In the first case just imagine you have a blog site that is hosted in India. And your blog gets lots of traffic from the USA.
Suppose, assume that there is no CDN for the website.
Then every time a visitor from the USA comes to your site, your hosting server will first need to fetch the content from the Indian server. And then after that, it will deliver content to your visitors who are in the USA location.
Since there is huge long-distance between India and USA server it will ultimately result in slow loading time for your blog pages (at least for USA traffic location of your blog).
Next in the second case assume that you got a CDN for your blog.
The site hosted in India and you get good traffic from both India and Indonesia.
So, now when a visitor from Indonesia comes to your blog for reading your posts, the hosting server will fetch and deliver the data from the nearest Indonesian server and presents the content for the user.
By now I believe that the logic behind CDN is clear for you. When you integrate CDN for your website, your hosting server will fetch the content data and deliver it to the user by accessing the nearest data center location of the visitor.
Steps to install CDN For WordPress Website.
There are many options to integrate a content delivery network for a WordPress blog. Actually, there is both free CDN and Paid CDN as well.
For small blogs, I think a free CDN is good enough. Cloudflare is one of the best among free CDN providers.
You will need to first install the WP Fastest cache plugin on your blog.
- Next, go to the Plugin setting options.
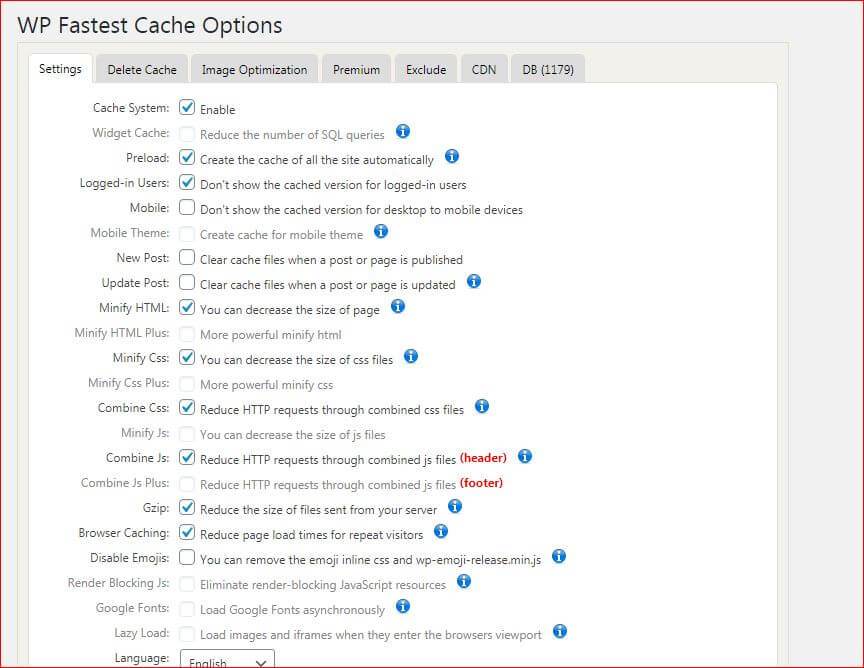
- Choose CDN Tab in the setting section.
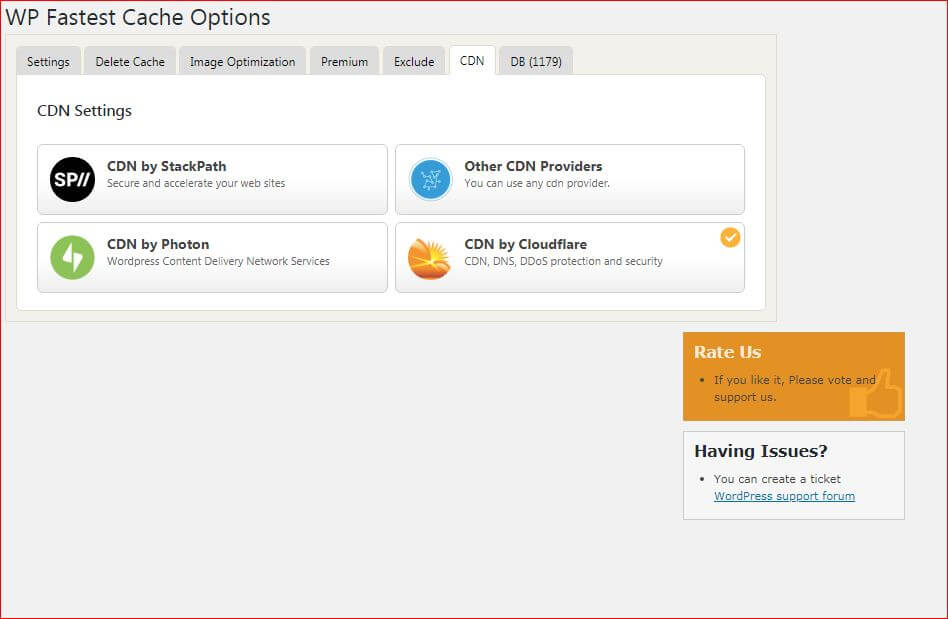
- Select CDN by Cloudflare.
Before you proceed further open a new tab in your browser and create a free account at Cloudflare.
I would recommend you to add your website for the Cloudflare and update the DNS records as well.
These reference links will give you the information to set up your Cloudflare account.
- Copy your Cloudflare API Keys.
- Then come back to your WP Fastest cache tab.
- Enter the API key and associated email id of your Cloudflare account.
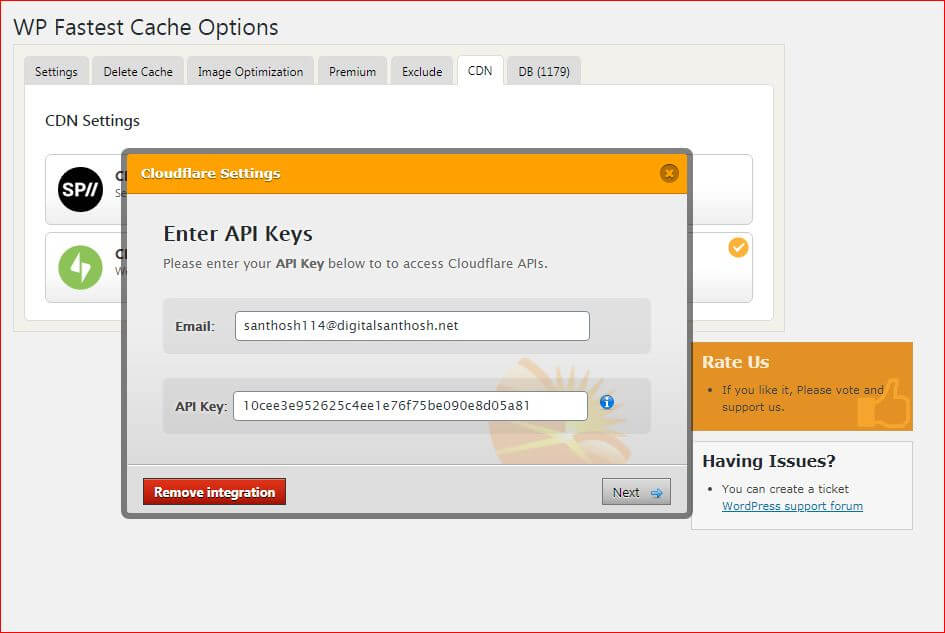
- You could keep the default option for “Disable auto minify” and “Rocket cache” options.
- Next, choose the duration for browser cache expiration. In general, it is kept for 6 months only.
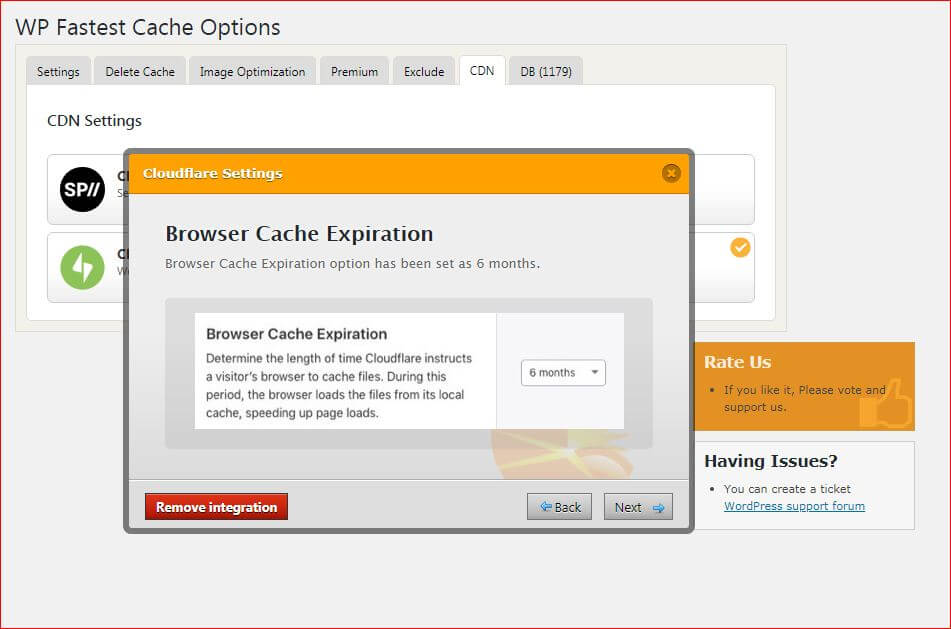
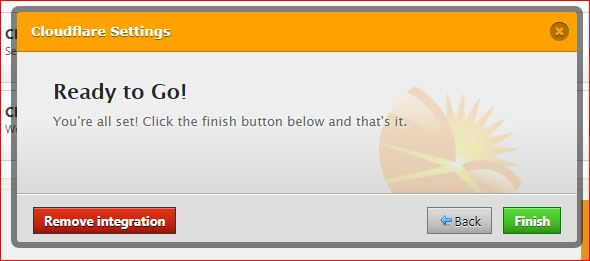
- Click on the finish button.
Conclusion:
Along with using these tactics, you should regularly update your older content. Because Google always prefers fresh and relevant content.
It is always crucial to implement new On-Page SEO tactics as fast as you can.
Because that would give you the fast movers advantage over your competitors.
I hope the strategies discussed in this article might help to improve the rankings of your website.
If this article was informative and valuable to you, then please do share it on social media sites.
Thank you.