

How to Setup your WordPress SEO Perfectly in 2021?
Last Updated on May 8, 2021 by Santhosh Muralidhar
WordPress is the most SEO-friendly platform for webmasters. WordPress is the basic requirement to do any type of SEO activities on your website. When you set up the WordPress SEO perfectly it will lay down the foundation for your website to strongly leverage & also help you get the benefits of implementing proven SEO methods. There are several crucial steps that should be implemented carefully while you set up WordPress SEO initially. It is important you must possess proper knowledge about setting up your WordPress SEO.
Let us now take a look at some of the important steps to set up your WordPress SEO.
Step 1: Have Just one website name and address (either www or non-www version)
This is one of the most common mistakes that beginner WordPress users would commit.
You should not have two different URL addresses for a single website.
Because if your site is loading on both www & non-www then Google would consider it as two different websites. And eventually, one of the websites will get recognized as a duplicate website. And that will lead to the www canonical error and issue.
For example, this www canonical issue arises when the WordPress URL is a www version and the website URL is on a non-www address. The vice versa is also correct.
Hence it is important to have a single & same exact URL for both WordPress and website addresses.
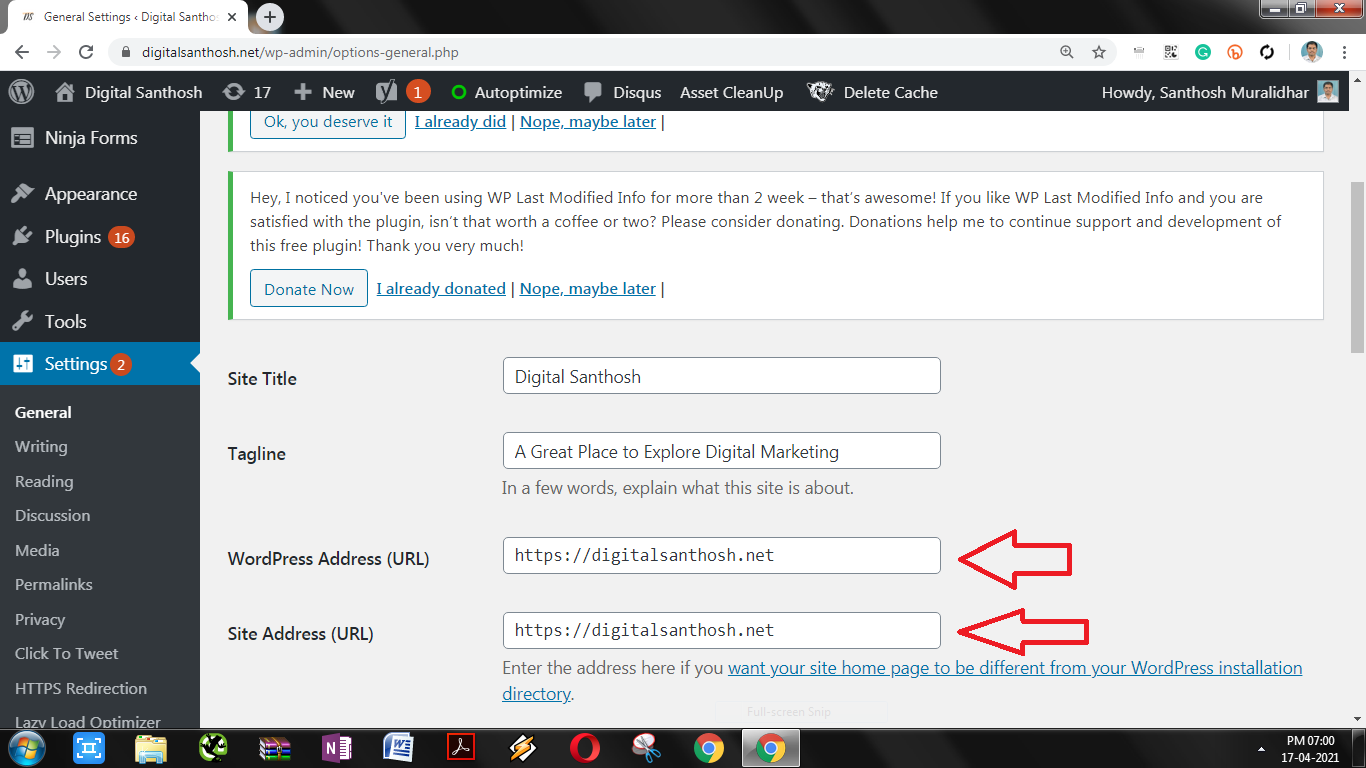
To enter your WordPress site URL you must go to Dashboard >> Settings >> General
And there you set your WordPress URL & Site URL address properly. It will be your preference and choice to pick only the www URL for both or the non-www URL for both settings.
The below attached screenshot describes the correct method to enter the website url & wordpress site url
Step 2: Ensure that your Website is visible to Search engines
If you want search engine crawlers like Google Bot to crawl and index your website then the first basic step is to simply allow them to do so.
Generally, when you install WordPress for the first time, it is assumed that your website is still in a nascent development stage. And hence by default, the search engine visibility will be blocked for your website.
But After getting the site live Most website owners would love to get a lot of traffic from Google.
To choose your search engine visibility preference head over to Dashboard>>Settings>>Reading
And there just ensure that you uncheck the box for the option which says “discourage search engines from indexing the site”. Because since we want Google to index our website it is better we uncheck this option and don’t choose it.

However, this option can become useful when your website is in maintenance mode for a long time. For example when you are performing large technical updates on your website (which takes beyond weeks or months) then only it makes sense to choose this “discourage search engine visibility option”.
Step 3: Choosing the appropriate Permalink Settings
Permalinks will determine how your web page URL & blog post URL would appear when they load.
Permalinks are also considered to be a very crucial component of your WordPress SEO strategy.
In fact, some reports suggest that having a great URL structure can determine the position of your website rankings.
Hence It is important to have a good SEO-friendly URL structure for your website.
To choose permalink settings go to Dashboard>>Settings>>Permalinks
It is usually better to avoid dates and numerics in your web page URL structure. Many WordPress SEO studies have indicated that havings dates in the URL can cause negative issues to the website SEO. On the contrary removing dates from the URL has proved to give positive rewards and better rankings.
Because For example. something like https://www.example.com/2012/08/digital-marketing-conference can appear to be very ugly and long.
A good SEO-friendly URL structure should contain the website name followed by the relevant post name or page name.
You can choose the post name option to make your website URL SEO-friendly. I prefer to choose the same for my blog site which you can observe in the screenshot.

Step 4: Install an SEO friendly Theme
The website theme which you use will speak a lot about your brand. The design, navigation features, user experience, and many more things are directly tied with the theme of your website.
And things like user experience and design are given more prominence and weightage in the SEO industry these days.
Because search engines like Google have already told that website user experience and design are a critical component for both rankings and technical wordpress SEO.
Hence it is highly advisable to choose a user-friendly and SEO-friendly theme like Astra for your WordPress website. The Astra theme is highly popular and it is trusted by thousands of WordPress users.
You can use the elementor website builder to build your WordPress website.
Step 5: Install Yoast SEO plugin & WP Rocket Plugin
When it comes to optimizing the blog posts and web pages there is no other better and trusted option other than the Yoast plugin.
Yoast is the recommended plugin by WordPress to do on-page SEO work.
The Yoast WordPress SEO plugin will cover 80% of the on-page SEO task of your WordPress website.
It will include features and suggestions for everything like keyword optimization, Meta tag & title tag optimization, image alt tag, internal linking, and much more on-page SEO-related stuff.
Optimize every single post or page with the Yoast plugin. Try to get the Greenlights and Good Yoast SEO rating for the SEO analysis and content readability Suggestions for every post and page. That should help you to boost your WordPress SEO.


Yoast will also automatically create sitemaps for your WordPress website. Sitemaps will help Google Bot to fastly find your website URL and index them quickly. This can help in ranking.
Also, you should integrate the Yoast plugin with your search console. You can submit the sitemaps (which are created by Yoast) in your search console.
To submit sitemaps in the search console you can follow these steps:
- Select Sitemaps in the left menu of your search console
- Copy the correct last part of the website sitemap URL page
- Paste the sitemap URL path in the search console settings
- Click on Submit sitemaps.

To improve the website speed, I suggest you use the WP Rocket plugin. This plugin is very popular in the WordPress community. It offers many features like CDN, Browser caching, minifying CSS & unwanted javascript, lazy loading feature for images, WebP, and more.
You can go through the below attached WP rocket settings screenshots below to get more clarity.


Step 6: Activate & Configure SSL settings
Google has now forced website owners to compulsorily use a secure HTTPS connection to their website.
Websites that use HTTPS connections might get better Google rankings. Because Secured SSL connection is also a Google ranking factor.
I understand this can sound a bit technical and complicated for beginners.
But you don’t have to worry much about it. It is not so tough to configure SSL and HTTPS settings for your WordPress website.
These days many web hosting companies are providing free SSL certificates. They are offering Free SSL from Let’s Encrypt. If you don’t have an SSL then you can get one for free from Cloudflare.
You will need to properly install and upload the CSR bundle and Private keys in your hosting Cpanel account under the SSL option.
After you finish validating the SSL in your Cpanel, you will need to configure it in your WordPress dashboard as well.
To configure the SSL just install & activate the Really Simple plugin. Choose your SSL preference and option in the plugin settings.

Also, You must install the HTTPS redirection plugin. This plugin will force your website to use the secured HTTPS connection. Also it will force the images and other web resources to use the HTTPs connection for the website.

And to check the SSL status and to ensure there are no SSL issues of the website you can use tools like https://www.sslshopper.com
Step 7:Optimize Images in WordPress
Images play a big role in your WordPress SEO strategy. And when you have a lot of images on the site it is important to optimize them properly.
I suggest you use tools like tinyPNG to compress your images before they are uploaded to the website. This will reduce the image file size and hence improve the page speed.
Also, ensure that there are no missing image alt tags. Add your keywords naturally in the image file name and alt tags.

I suggest you refer to my WordPress image optimization guide to get better clarity.
Step 8: Create Categories For Your Website
Categories are a crucial component of your website WordPress SEO architecture. If you have service/ product/article pages about different topics then it is better to group them individually. And you should place each of those service or article pages under one specific category.
For example, on my digital marketing blog, you can view various categories for the blog posts like SEO, Social media marketing, email marketing, search engine marketing, etc.
You can create categories easily in the WordPress dashboard.
Go to Dashboard>>Posts>>Categories. There you can add new categories for your website.

And inside your WordPress post editor/page editor just select the correct & relevant category which you had created earlier.

Step 9: Comment Moderation
When your website has a lot of thoughtful and valuable comments it can have a positive impact on your SEO rankings.
You must reply thoughtfully to every valid comment posted by your user. Try to help your audience by replying to their comments. You can think of giving any good valuable tips and suggestions for the queries posted in the comments.
But one major issue with comments is that some people try to post spammy things in the comment section. This however is not a good thing from an SEO point of view.
You should use comment moderation plugins like Akismet or Disqus to properly filter out spam comments. And these plugins will also allow you to set up automatic comment moderation. So, for example, you can delete comments automatically that contain specific spammy words, links, bad words, and useless content.
Also, it is better you delete any type of spammy links in the comments. Because having too much spammy comment links can cause a negative SEO impact.
You could also choose the comment moderation settings in your dashboard. To do that you just need to head over to Settings>>Discussion. There you will find the suitable options to select the comment moderation settings.

It is always very crucial to make the wordpress website SEO friendly from the initial beginning stages itself. This can help us to reap better SEO returns in the long run.
I hope this article was useful to you. If you like this content please do share it on social media sites with your friends.
Thanks.

Pingback: clindamicina interacciones medicamentosas
Pingback: levothyroxine and fluoxetine
Pingback: therapeutic dose of zoloft
Pingback: flagyl animals
Pingback: long term effects of lexapro
Pingback: weaning gabapentin
Pingback: can you drink alcohol while taking cephalexin
Pingback: macrobid vs bactrim
Pingback: amoxicillin with clavulanate
Pingback: is augmentin a sulfa drug
Pingback: baldur's gate 3 controversy
Pingback: effexor dose
Pingback: citalopram hydrobromide 20mg tablets
Pingback: does augmentin have penicillin in it
Pingback: when should i take ashwagandha
Pingback: flexeril vs baclofen
Pingback: celecoxib adverse effects
Pingback: celexa for depression
Pingback: repaglinide patent expiry
Pingback: actos educativos
Pingback: sitagliptin can cause yeast infection